

In celebration of American McGee’s Alice 2: Madness Returns coming out today (June 14th!), I decided to see if I could make Alice’s classic dress and apron, and learn to sew in the process. Yes, that’s right, I’ve never sewn an entire costume from start to finish. Most of the fully sewn costumes that I’ve done, I’ve had help from Mario or his mother. So, I decided that I’m going to learn to sew so that I don’t have to ask for help in that department anymore, and I did some research and bought my materials.
(Make sure to check out part two, here!)

This costume took 3 days, and about 15-20 hours to complete. Really an easy costume. Most of the time was me learning to read the patterns, figuring out the apron, and trying to figure out why my bobbin kept knotting up (which of course gave me a few hours of ripping out seams).
Materials (what I bought, but I did have extra fabric left over, maybe 1/2 a yard of each):
Simplicity 4015 pattern
Simplicity 4282 apron pattern
4 yards of blue fabric (I used cotton)
3 yards of thick white fabric
3 yards of 1.5 inch lace of your choice (if you choose to put lace at the bottom, I’ve seen several pictures of the new game where she has lace at the bottom of her skirt; either attached, or hanging from the bottom of a petticoat)
18″ zipper
Matching thread
Printable iron on transfer paper (for the symbols on her pockets)
(I also got some items that you should already have if you’ve worked with patterns: pattern tracing wheel and tailor’s transfer paper)
I also bought a book that I highly recommend if you’re new to patterns, or want to learn to adapt or design your own patterns. The title is pretty self explanatory: “How to Use, Adapt, and Design Sewing Patterns”, by Lee Hollahan. This book really helped me to understand how to get started with my sewing patterns, and I know that I wouldn’t have quite understood the instructions to sew the dress without this book.
All of the materials I bought cost $85. You could easily get cheaper if you watch sales and use coupons, but there were no coupons for that day, and if I had waited a few days for the coupon, I would have not been able to make the dress in time. I think you can easily do this costume for under $100, with tights and wig (or you could use your own hair if you’re able), I already own boots that are very close to hers as well. I also ordered a petticoat, so I will update this post with the completed costume once I get it and the stockings, but this tutorial is just for the sewing of the dress.

I used the 4015 pattern for dress C, minus the apron and apron tie. Follow directions to sew the dress, but when you cut out the skirt pieces, make them 16″ longer. You can always hem the skirt shorter if it’s too long, but obviously you can’t really add on more fabric without there being a seam there. Also, if you’re going to wear a petticoat with the dress, the skirt will be an inch or two shorter with the petticoat under it. Keep the notch in the side of the skirt where it is; when the directions say to sew up to the notch, and the notch was halfway down the original length of the skirt, I thought maybe I needed to sew to halfway down the new length of the skirt, but after reading forward on the instructions, I saw that the reasoning for this is the zipper goes down into the skirt as well. So, continue to follow the directions. Make sure to size the dress on yourself or a dress form to make sure it’s going to zip up in the back and fit you correctly; I had to take in mine a few inches to make sure it was correct, even when using the correct size pattern.
 This was the dress before I added the zipper, hemmed the neckline and added the lace at the bottom.
 For the apron, I only used two pieces from the apron pattern, from view A. The front apron pattern piece that you see in the picture above, and the tie pattern piece that you’ll see later on. I cut the pattern on the large size line to make it as wide as possible, and also left the margin on the side of the pattern, as you can see in the picture. Make sure to cut the piece out with the long flat side on the fold! I then held up the apron pattern to the back of the dress, and marked about an inch below where the skirt and blouse meet. Trace and cut the back part of the apron out just like you did the first, but end it where you marked the line on the pattern.
 I held it up to the skirt, pinned the bottom of the apron up so that the length was correct, and also pinned the sleeves at the top where they needed to sit so that I could sew them there. I then hemmed around the entire apron, front and back.

The bow took me a few minutes to figure out. Originally I was going to follow this tutorial for making a huge bow, but I figured out that Alice’s bow is too long and short to make a bow like that, and besides, in the pictures you can obviously see that it’s like a bow that you would tie. (I haven’t gotten/made the skull for the bow yet, so I have no suggestions on that part, sorry.)
 Figure out how tall and wide you want your bow. I made mine 18 inches long and 6 inches tall, so I cut a rectangle that was 6.5 inches tall and 39 inches wide, and cut it on a fold rather than cutting out two pieces. Then sew closed two of the sides, turn it right side out, fold the last open side in about half an inch, and iron it so you have a nice clean edge, then topstitch it closed (sorry… forgot to take a picture D:).

Ok, so now fold the rectangle like so, and sew up the middle.. When you bunch it in the middle, it should look like a bow:
 Use a needle and thread and tack the bow together so that it’s bunched together in the middle like it needs to be. Then, make a piece that goes in the middle out of a rectangle and sew it on there too:
 After that, I decided to work on the pieces that hang down from the bow. I figured they were 18″ long, and just used the tie pattern piece from the apron from before.
 I cut two of these off of the large size line on the pattern paper, and hemmed the entire length, then folded and ironed on the diagonal where it indicates on the pattern, and hemmed the end of the tie.
 I then pleated the tops of each tie, and sewed them to the back of the bow (not shown in the picture above, that was just me setting them with the bow to make sure they looked right).
 I decided to not sew the waistband to the apron, but I may later on. I made a waistband that was four inches longer than my waist on each end, about two inches wide. I added velcro on the back, and threaded it through the back of the bow, where I left it open. I also sewed some belt loops on to the back part of the apron, on either side of the middle of the bow, to hold the waistband where it needs to be.
 Ok, now for the pockets. I just traced out the size and shape of the pockets on a piece of paper, traced that onto some fabric, and cut it out large enough to take care of the seam allowance.
 I then ironed down the seams on all sides of the pockets.
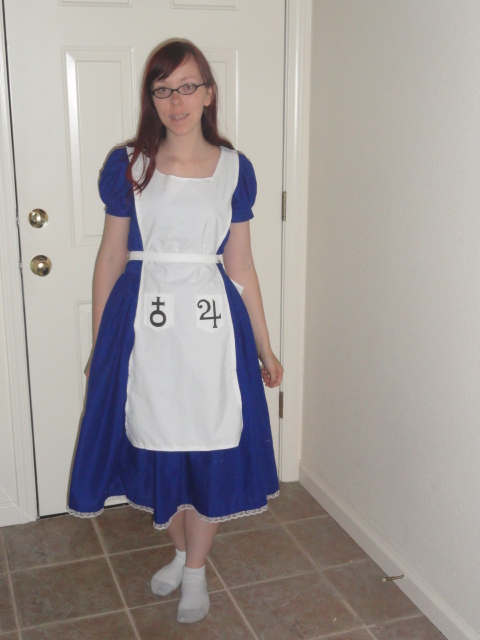
 Once they were both nice and flat, I printed out the symbols for Alice’s skirt on iron on paper, and carefully cut them out with scissors and an exacto knife. By the way, the symbols are planet symbols!
 The picture of the symbols were found here. The symbols on her skirt are Venus upside down, and Jupiter. I used a different set that looked similar to the ones on her skirt, and then modified them a bit more.
 Make sure to size them to the pocket before you print them on the iron on paper! We just printed them out on regular paper a few times until they were the right size.

Sew the pockets on, and you’re done!
The only things you need to add are the petticoat (if you’re choosing to use one), the boots, the black and white striped tights, the necklace, and the skull on the back of the bow. I’ll update with a complete picture when I have all these things! I hope this tutorial was helpful, and please let me know if you have suggestions for future tutorials!

I like how it turned out! It’s perfect! I plan to make an Alice costume and I hope mine turns out as good as yours did!!
heya! while looking for the symbols for this dress i stumbled on your bloggy thing! amazing job, i laughed so hard when i saw you used the exact same pattern as i did. you mentioned something about the skull, i am making mine out of stiff wool felt. i embroidered the skull pattern to it ( you could certainly cut out the black parts out of black felt and sew them on) well after cutting out two of the skull shaped felt, i sewed them together and filled with a bit of stuffing. this way its not too heavy and wont weigh down the cute bow. great job on the dress… i hope mine comes out as perfect as yours!
Haha thanks! We still haven’t made the skull yet >.> At this point I think we’re going to do the same thing we did with my Witch Doctor and take a skull head and just cut it in half and fill it in and attach. I like your idea too though :)
Hi really good instructions,but wasn’t the dress supposed to have blood splattered all down it?
I suppose, but I’m not quite done with it yet.
Pingback: Final touches on American McGee’s Alice costume: how to | Arms, Armor and Awesome
Back of the apron >.< I can not figure out for the life of me, how to attach the back panel at the waist, and have it stay in place. Any tips on how you did it?
Well, mine is held in place by the waist strap, which isn’t even permanently attached to the apron. There are two loops on the back of the apron that the straps go through, then velcro the two ends of the straps together tightly, which holds it at my waist. Make sense? I can grab a picture if needed :)
Thank you soooo much! This helps tremendously! A picture if possible, would be fantastic! :)
Thanks again!
Here is a picture of the back of the apron, with the straps, and how I put the straps around with the velcro. After the straps were attached to each other I just slid them under the straps on the apron, behind the bow to hide them.

Thank you! ^o^ -runs off to bu materials-
Hello there! I noticed you said that your bobbin kept getting stuck, and that is the exact same problem I have been having! So could you please explain to me what the problem is and what I should do? (I would be eternally grateful!)
~ Meg Xx
Hi! What was wrong was we actually had in the wrong size bobbin, I had bobbins from my other machine mixed in with the ones for this one, and since it wasn’t the right size, it wasn’t working correctly. Apparently plastic vs. metal bobbins make a difference too, I used a metal one of the right size and now it’s working perfect. Just look up your machine’s manual to see what size bobbin to use!
Thanks so much! I have only had one sewing mchiene though… Is it possible it could be because of bad quality thread? The thread kept snapping :/
Hm, it could be the tension on your sewing machine is too high? Here is a list of troubleshooting for common problems like that: http://aces.nmsu.edu/pubs/_c/c-202.html
Than you for the help with that! I think I have sorted it out :D I have just bought the same dress pattern as you, and it doesen’t seem to make sense.. :/
Wow! THANK YOU so much for the tutorial ^_^
Im going as her for Halloween so i was thinking of just modifying a dress if i found a good one…
but if i dont find one, this will help me out a lot!
So glad we could be helpful!
Woww, you’re amazing! Love this! Thank you very, very much! — xoxox <3
Wonderful tutorial! I’m planning to cosplay Alice and this helped immensely.
Just one thing, though: The astrological symbol isn’t upside down Venus. It’s the symbol of Eris.
Ah, thank you! We had no idea, and couldn’t find anything else saying what it was. Thanks!
YOu are putting a big skull on it right? becuase she has a huge skull in the middle of the bow in the back. I can’t for the life of me find any size 16 american mcgee alice dresses so i found your page and i’m making one for sure. I think a very dark blue would suit me for what I want. i want to make mine look more wicked since my husband is going to be a dark mad hatter (not the new movie version..to bright)
Nope, I think we decided to keep the skull where it is. Apparently I forgot to post better photos of the finished costume, so I just updated the post with them! I’m sure your Alice dress will look amazing!
Amazing cosplay! I’m planning on doing my first cosplay soon, and this really inspired me to get to work on it! I really love the dress and the way you did the makeup!
Thank you! Good luck with your first cosplay!
is it 3 square yards or a 3×3 piece of fabric
I’m new to sewing so sorry if the answer is a bit obvious to others :D
It’s neither, it’s 3 yards by whatever length the fabric you get is- usually it’s 40 something inches wide, so it’d be 40″ wide by 3 yards long. Just ask for 3 yards at the fabric store :)
Thanks for the tutorial. Putting the finishing touches on this dress for my daughter so that it is ready for Dragon*Con.
I’m finishing the dress, and she’s finishing the game. I guess it works out?
Anyway, excellent tutorial. Very clear, and enough pics that everything makes sense.
–j–
Do you have any advice when some one want to make the steamdress from Alice the madness returns?
Hi! It really depends on your sewing level. You could probably find a similar vest/corset item and modify it with faux leather to have the skirt part of the apron. You could use the same dress pattern I used for this costume, but with different fabrics. This lady made the steamdress and wrote a bit how she made it: https://www.acparadise.com/acp/display.php?c=60368#costumeinfo
Usually when I’m figuring out how to make a costume, I first see if anyone else has made it and I look at their progress photos/end result and see what types of materials they used or how they viewed certain pieces. I hope this helped!