Items mentioned:
Where we bought our worbla
Thanks for being so patient in waiting for our next podcast! We’ve been busy, as you’ll see!
Music by NoppZ (at OverClocked ReMix)
Thanks for listening!

Items mentioned:
Where we bought our worbla
Thanks for being so patient in waiting for our next podcast! We’ve been busy, as you’ll see!
Music by NoppZ (at OverClocked ReMix)
Thanks for listening!
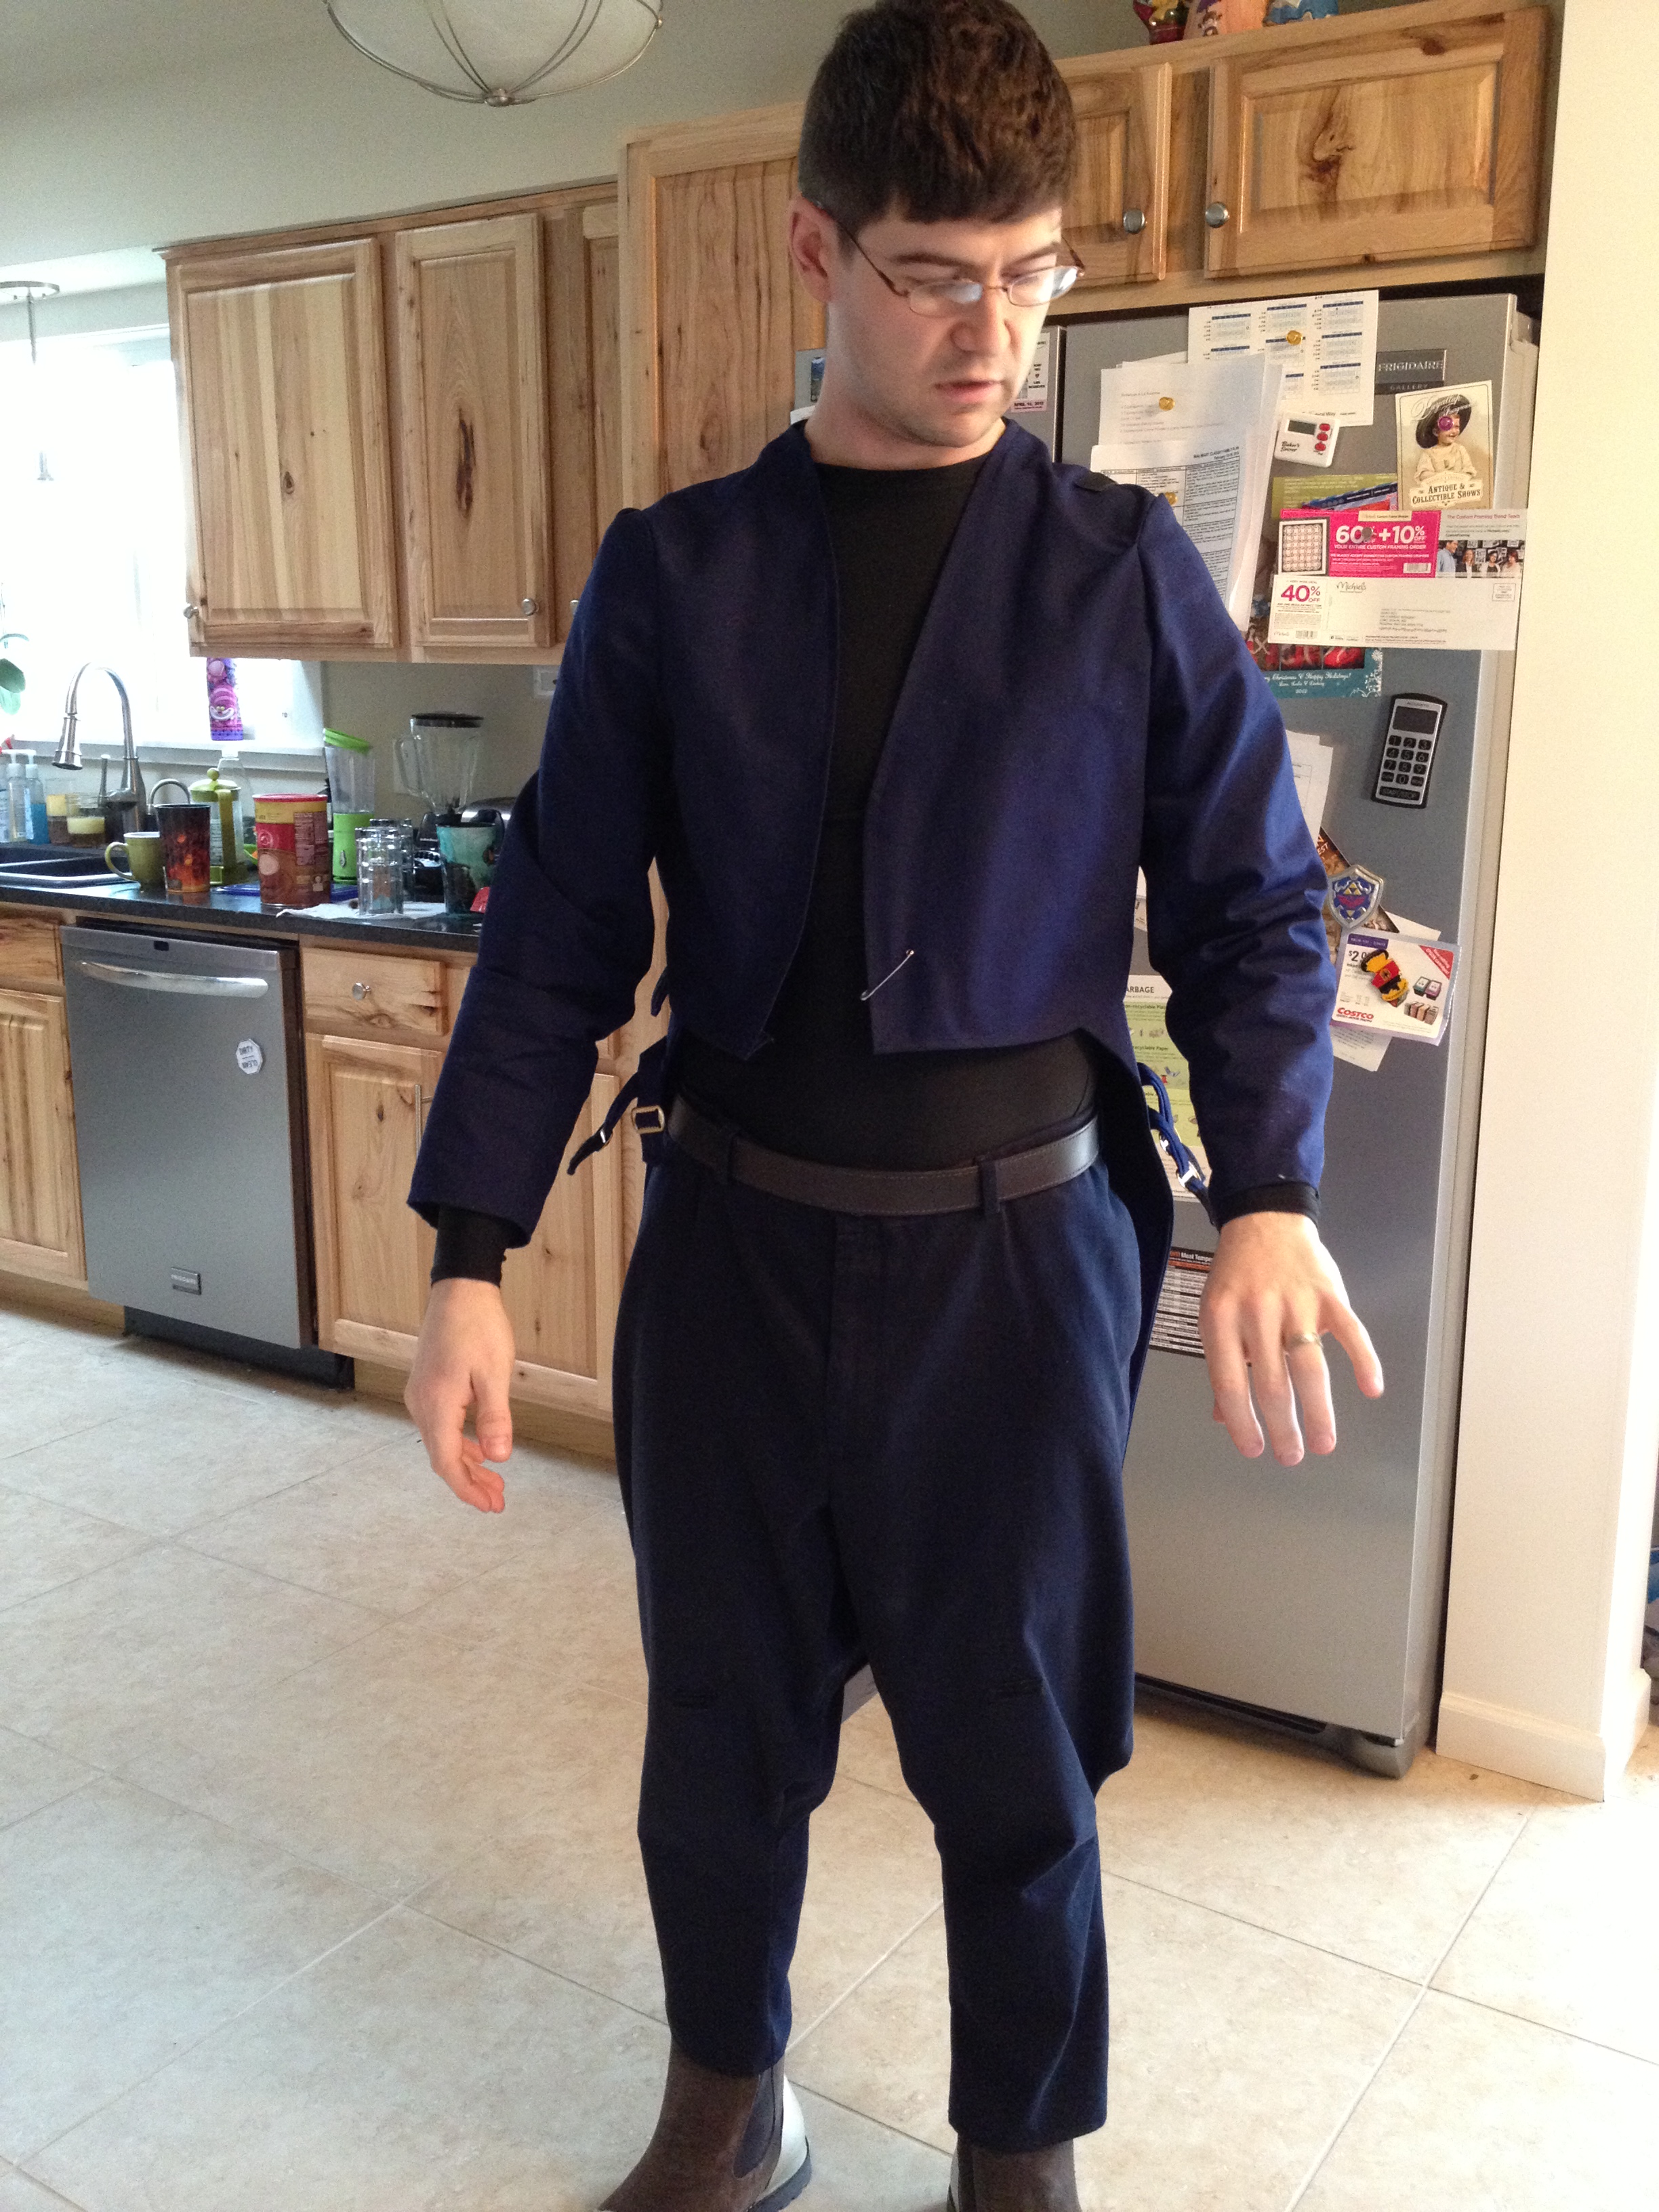
We often say that it’s important to build your costume in layers- to break down your costume into more manageable pieces to sew or build. Here is an example of how we did that for Jayce!

Jayce, from League of Legends
Here’s Jayce, he’s a pretty cool guy, but he’s got a lot going on. He’s got knee armor, gloves, greaves, a coat, some chest…thing? and this collar that stands up in a way collars really shouldn’t. I’d show you my terrible drawings breaking it down, but I’m not sure you’d be able to really make heads or tails of them, so here’s how we broke down the costume into layers, and the order we put them on!
 We started out with a long sleeve under armor shirt, the pants (with a belt holding them up, the belt secured in the back), the shoes, and the shoulder armor strapping.
 The strapping was inspired by a side gun holster- front and back both clip on to another strap coming from each side of the shoulder, and the shoulder is held on and supported by the strap going around his arm, and down to his belt.
 Next, the coat!
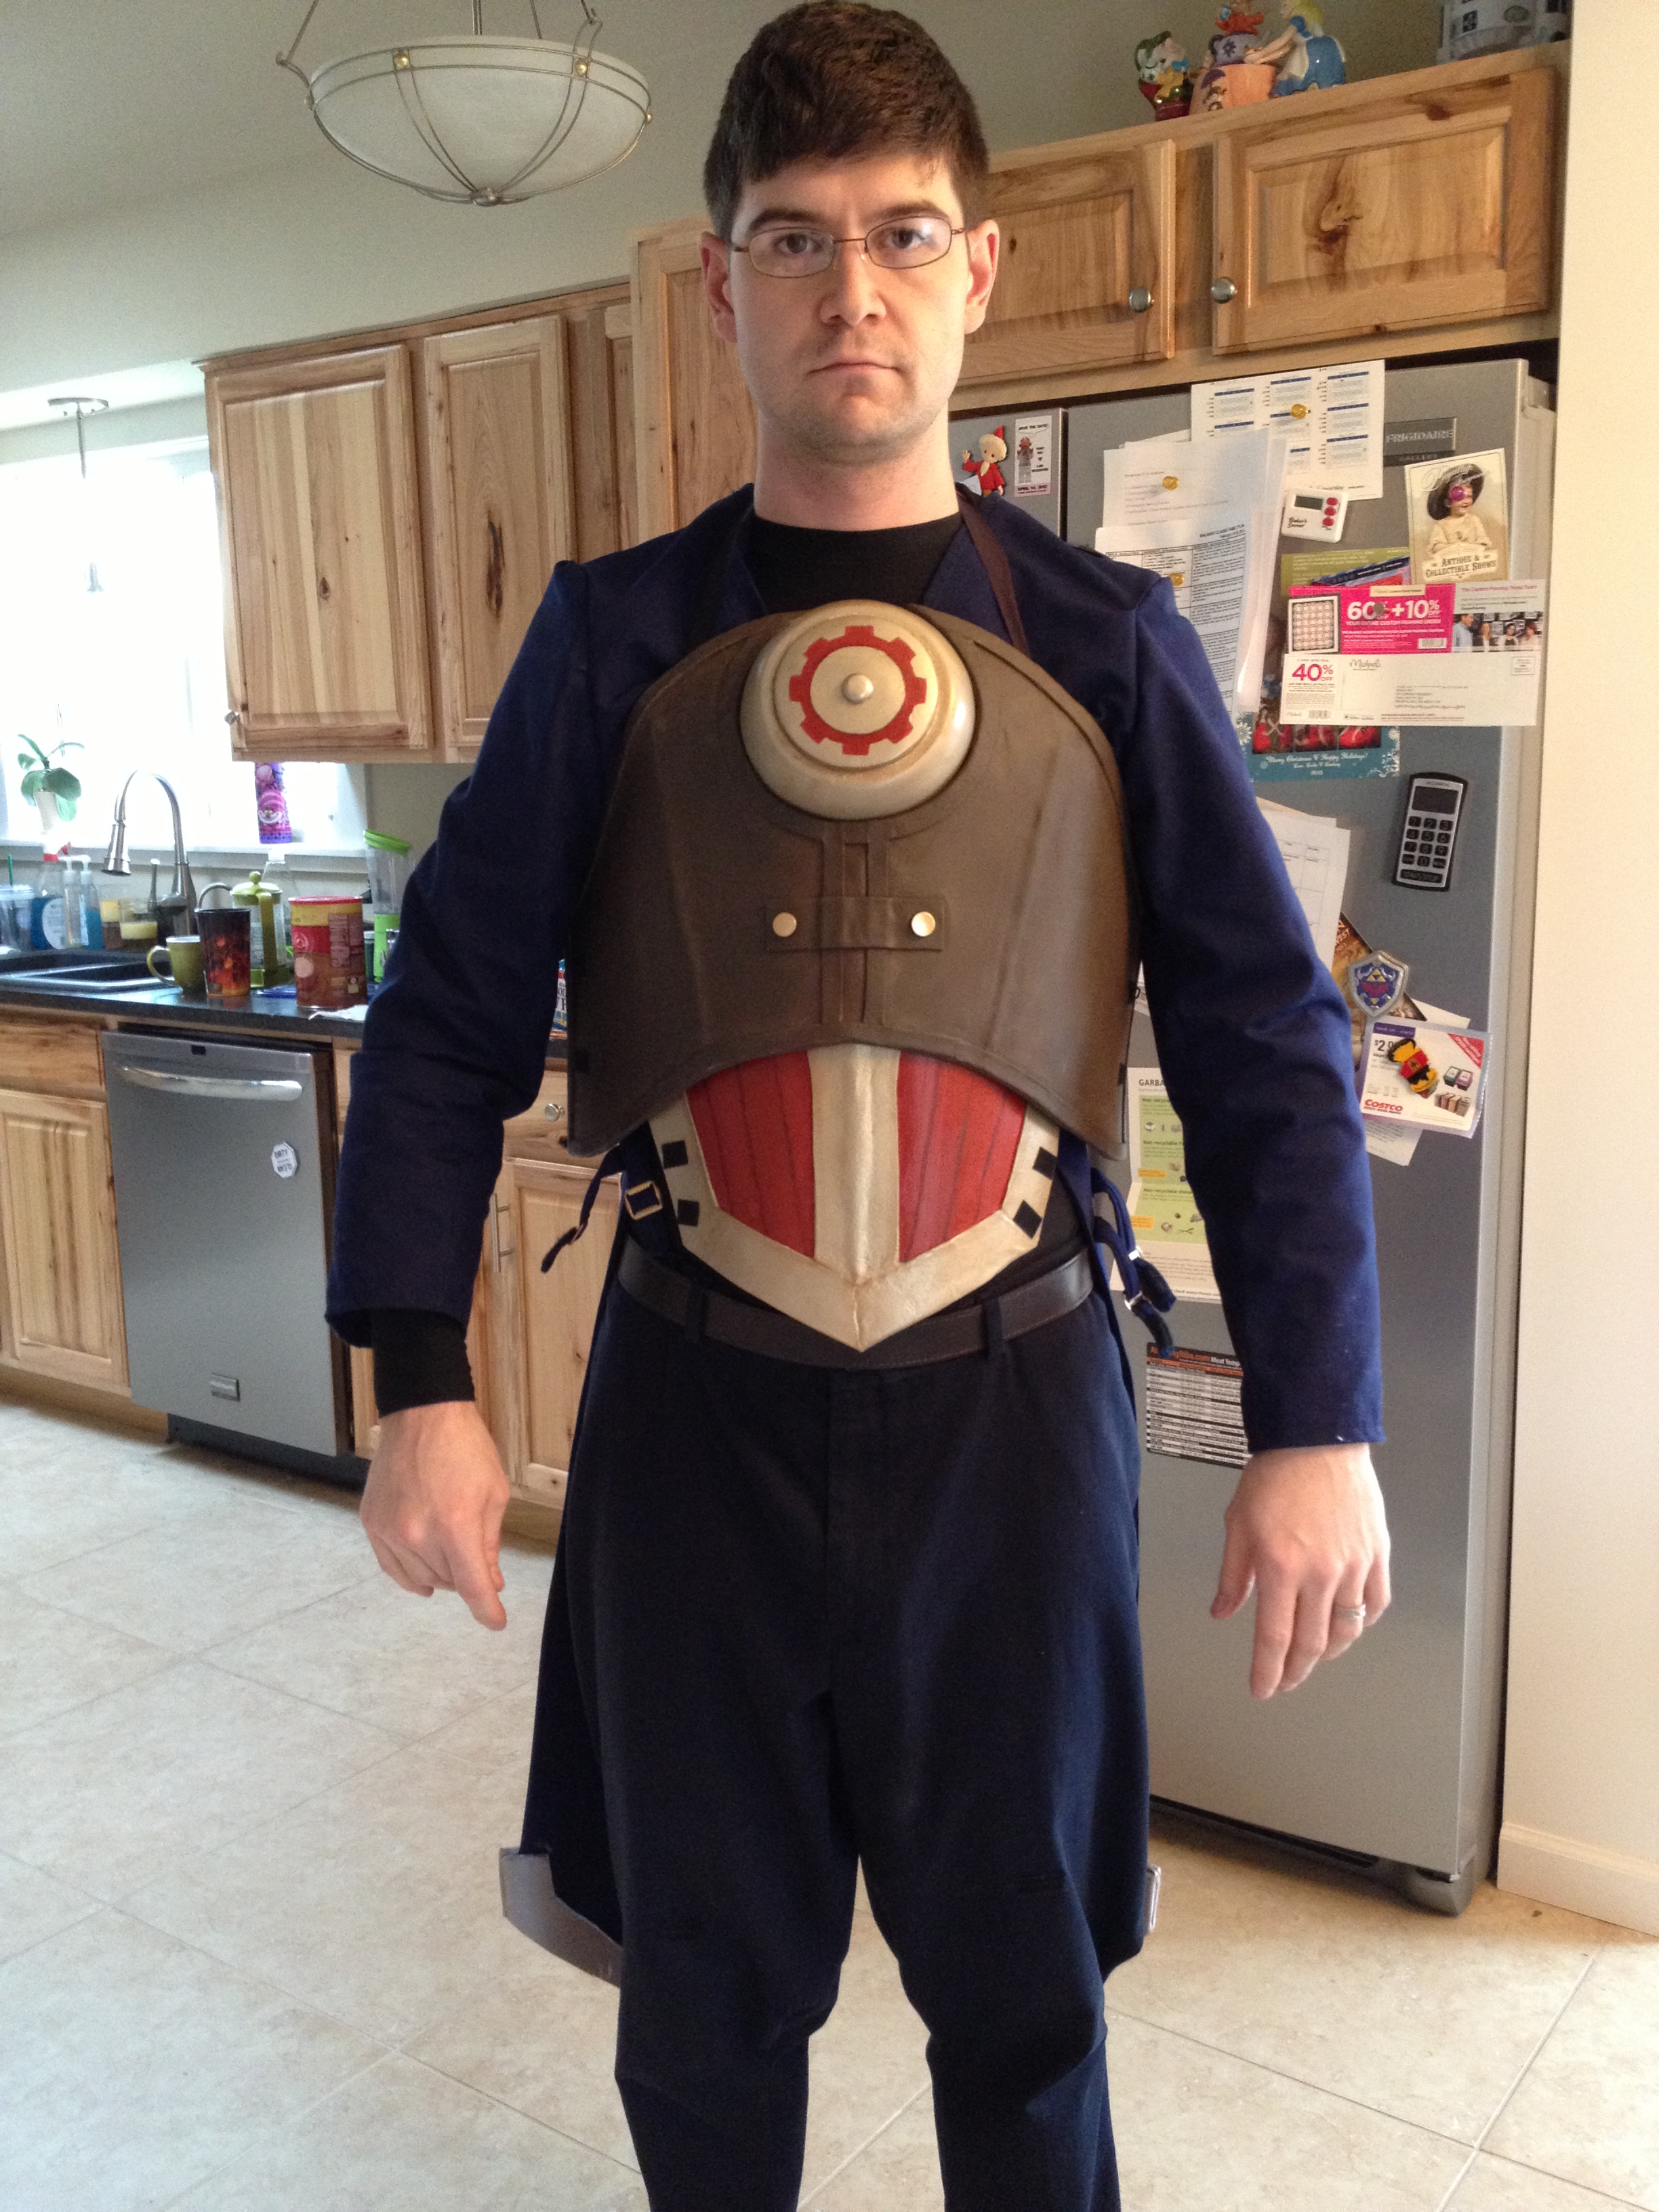 Then the chest armor. These pieces are all glued together but were originally three separate pieces. It’s held on by a strap that goes around his neck, like some weird awesome medallion. The straps on the side are purely cosmetic.
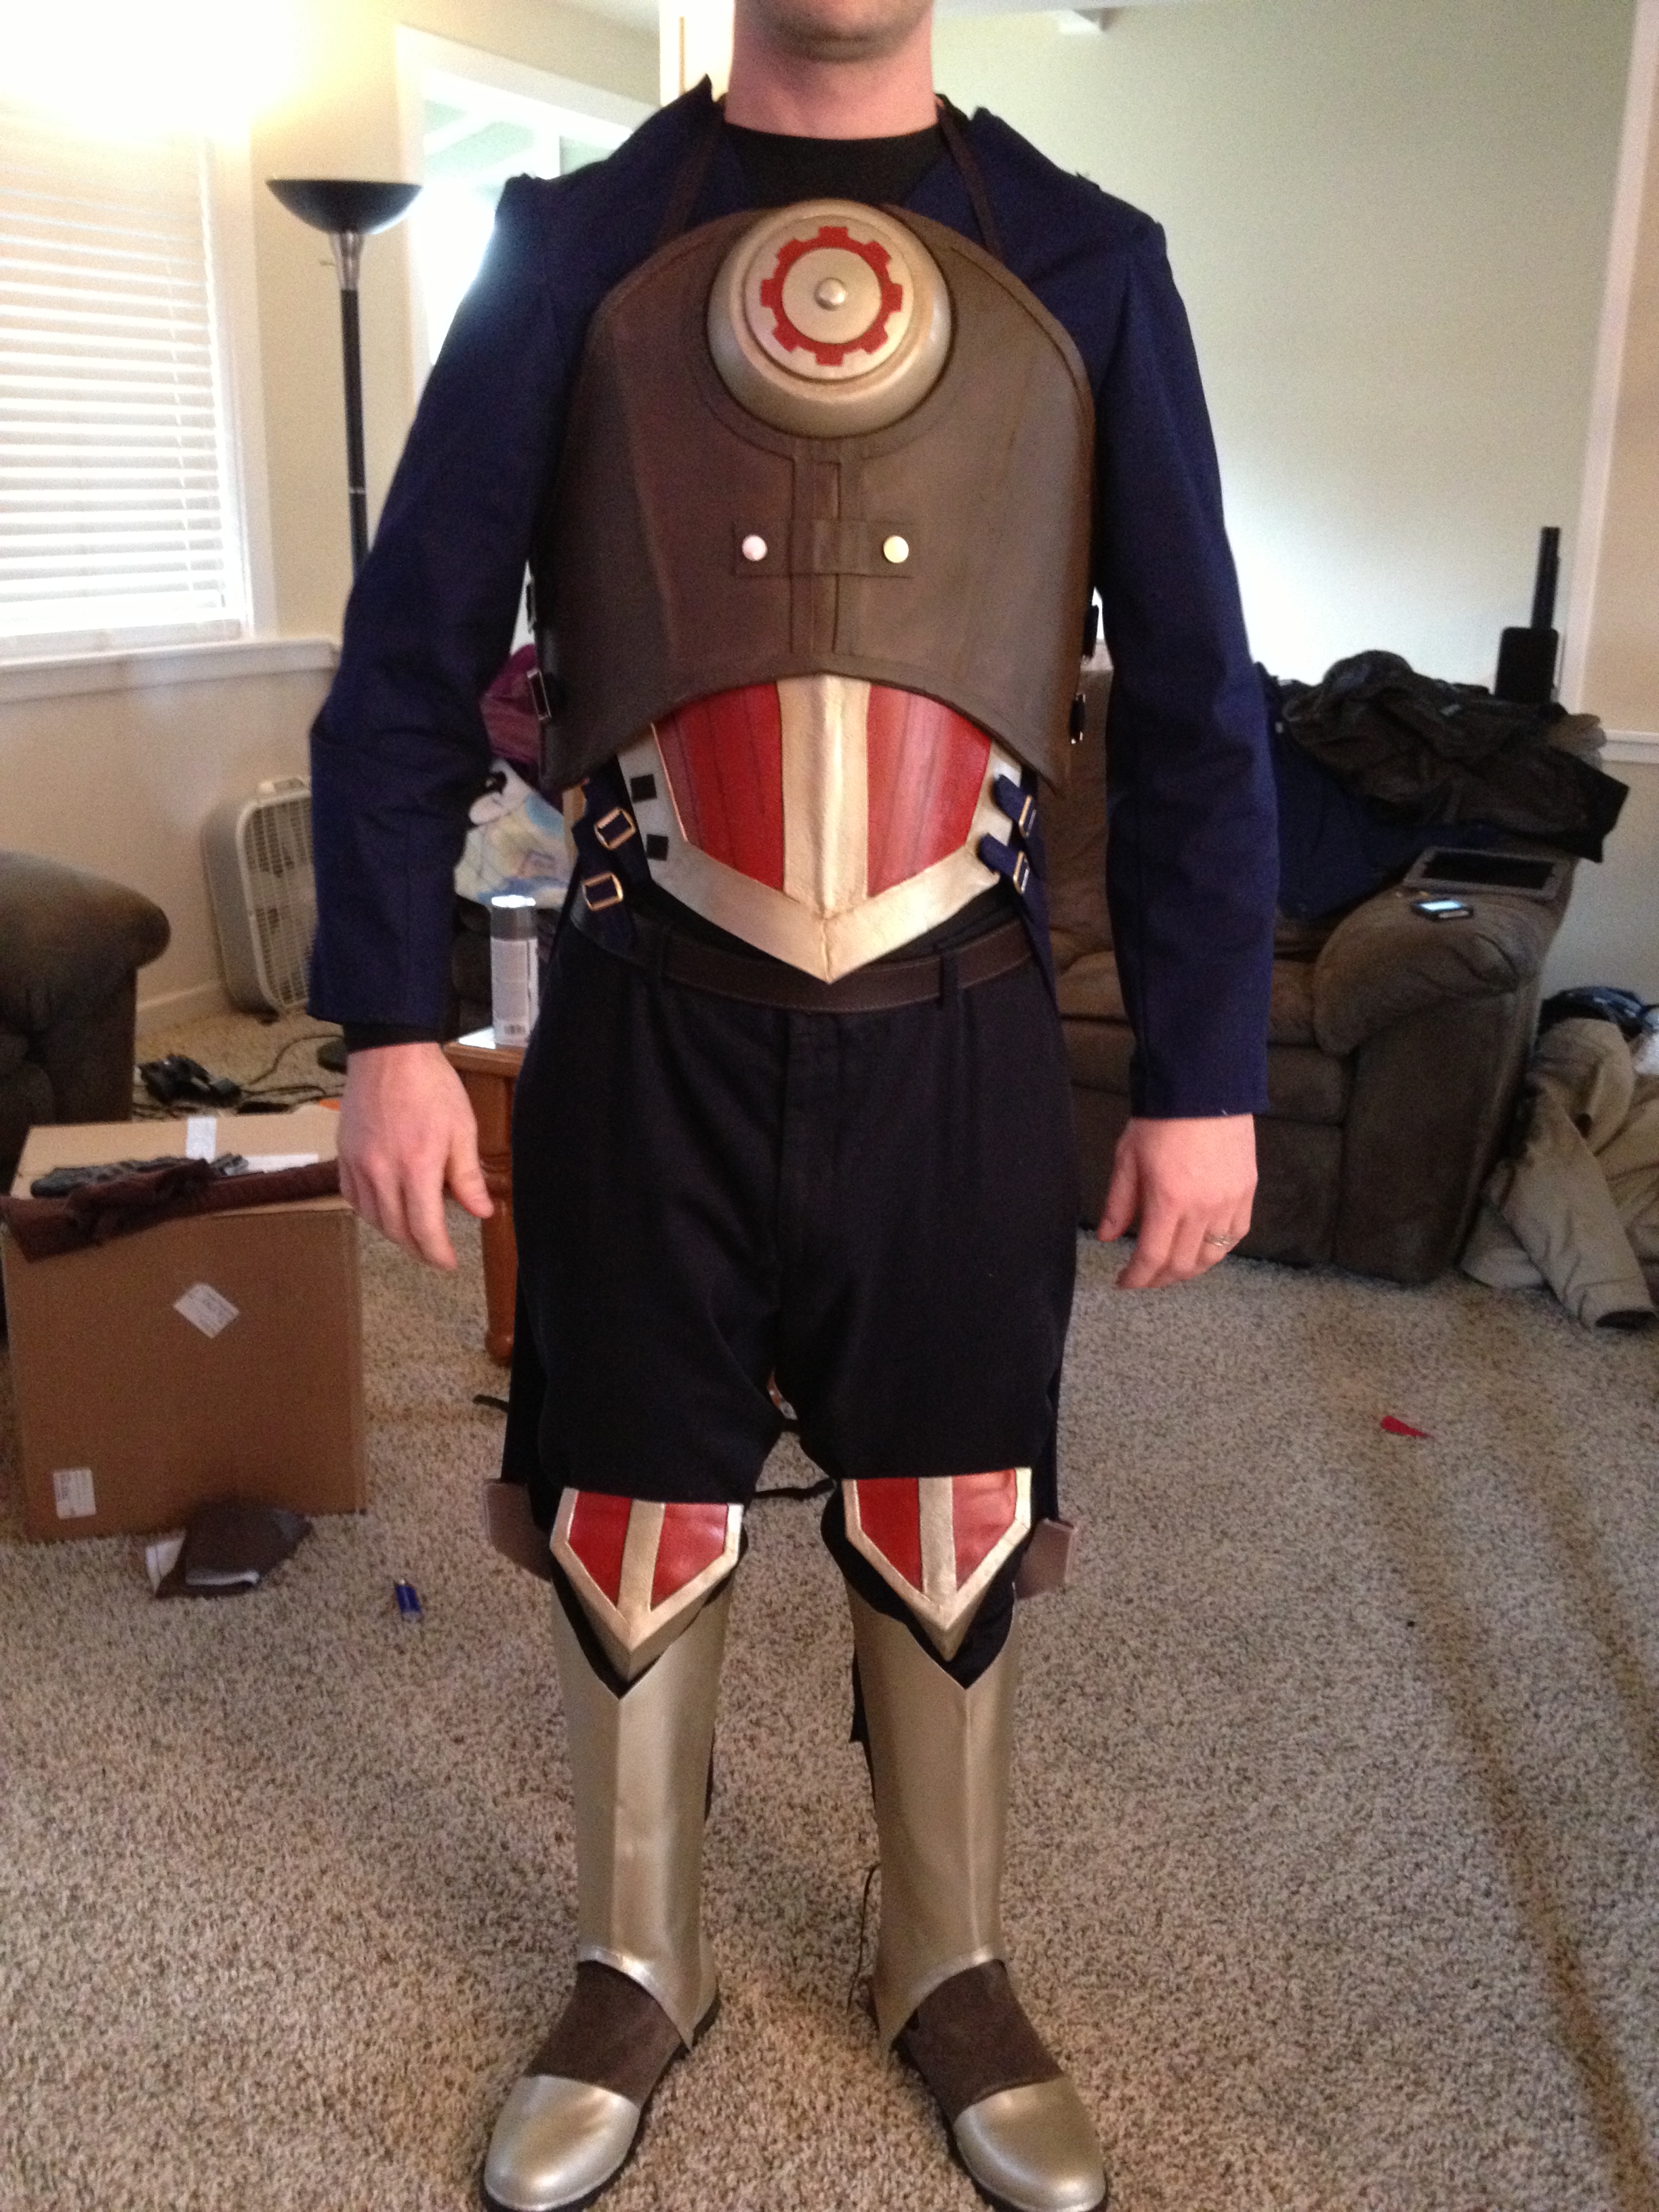 Then the greaves and knee armor! These are held on by snap clips and straps that run around the back of his leg. The armor on the shoes are from worbla and glued on there.
 After that, the collar. The front part is tucked in behind the chest piece.
 Lastly, the finishing touches! Gloves, bracer, and both shoulder armors are strapped on and ready to go.
We’ll probably have a nice tutorial up at some point on the mace and costume, but this post was to demonstrate the importance of layers!
Just in case you guys are new or don’t watch us on Facebook, Mario and I have put up a few new video tutorials on our Youtube channel. We will be posting a few more: how to make a scabbard, and how to finish the sword. I have also posted a few videos on face and body painting! You can see these below, or go to our Youtube page to check out all of our videos!

Items mentioned:
Screenshot of Tony Harris’ rant
Bioshock hires cosplayer for Elizabeth
Music by NoppZ (at OverClocked ReMix)
Thanks for listening!

Art by Lyeric- facebook.com/LyericCosplay
If you have a cosplayer in your life, you may not know enough about the hobby to really get them a good gift for the holidays. That’s why we decided to step in with a nifty gift guide to give you all some awesome ideas!
First, figure out- what kind of cosplayer is the gift receiver? Do they prefer to sew, paint, make weapons or armor? Do they always talk about needing wigs, or wanting new materials to try? These are all things to consider, because one gift won’t work for every type of cosplayer.
Note: I linked a lot of items off Amazon, because it was the easiest way to find everything, and in my opinion, usually the cheapest. Do some shopping around if you’re the type to need to, but we are in no way affiliated with Amazon.
For the Sewing Cosplayer:
Here is our fourth podcast! We are sorry for the delay, we had guests in town.

Photo by Tony Hsu
Links mentioned:
God Save The Queen Fashions notes on Commissioning
Silence Drowns Craftmanship Contest Tips
Music by NoppZ (at OverClocked ReMix)
Thanks for listening!
Remember to check iTunes, the podcast should be up on there shortly!

Photo by Blizz Planet
Here is our podcast for the week! We talk about Pandaria, cosplay (of course), and fiberglassing!
Wind of the Stars Cosplay page, and Youtube page!
I’m also selling some wigs on our Facebook page, check them out!
Music by NoppZ (at OverClocked ReMix)
Thanks for listening!

Hi guys! We have another podcast for you all! This one is more focused on commissions and adhesives!
Here are the links we talked about in the show:
Shinju’s Workshop Facebook Page
God Save The Queen Fashions and her note on commissioning.
Upcoming cons: Comikaze, Montreal Comic Con, RamenCon, Anime Weekend Atlanta, and New York Comic Con.
Adhesives: Loctite Go2Glue and the 3M 77 spray adhesive.
Music by NoppZ (at OverClocked ReMix)
Thanks for listening!
We finally found the time to put together a podcast for you all! We hope you enjoy it!

Click on the link, and listen away!
We are now on iTunes, as well!
Links from the podcast:
Earlybird Costumes commissions
Conventions mentioned: PAX, SacAnime, Kumoricon, DragonCon, Sabotencon, Mechacon, Tracon.
You can find Worbla’s finest art here!
Music by NoppZ (at OverClocked ReMix)
(Today’s guest post is by Petrai of Petrai Cosplay! She did an amazing Tyrande cosplay for Blizzcon 2011 that we just loved so much that we asked her to do a guest post for us! You all should definitely go check out her page! As usual, you can click on the photos to see the larger version!)

Hey all! I’m happy to be writing a guide for Arms, Armor, and Awesome! Tyrande was definitely a big undertaking but so rewarding. It was a huge learning process as my first cosplay ever and after 6 months, turned out just how I wanted it!
LATEX DETAILING:
So here I’ll basically just focus on the sculpting aspect of the costume, rather than the sewing. This includes all of the silvery dress detailing, as well as armbands and other bits. It was difficult to decide what material I wanted to use, since I knew I needed it to be strong, but also flexible enough to bend with my body, and around my arms with negative space between details. I ended up choosing semi rigid latex, which has basically the consistency of dry hot glue. Clean pulls, no mess, semi rigid and easy to use!
I started off by drawing a to scale blue print of the central detailing on the dress, as well as the bracelets, and then sculpting it in plastalina modeling clay. 
Plastalina clay is the non-hardening clay that they use in Claymation, which is what I needed for the plaster mold. I chose this type of clay so that picking all of the bits out of the mold wouldn’t be overly taxing, plus I could leave my sculpts for days on end and come back to them when I wanted to continue working. The reason I needed a plaster mold vs. a silicone mold is because the final positive would be made of semi-rigid latex, which cannot harden in a silicone mold. I ended up gluing all of the clay parts together with super glue, just to keep it all from rolling around when I moved it or poured plaster. The plaster was very easy, I used normal cardboard boxes as mold boxes and hot glued them to make sure they wouldn’t leak, and poured the liquid plaster over the clay. When my plaster was hard, I removed the mold from the box, let it fully dry for 24/hrs, and poured my latex. The trick with the latex was to make sure it was 100% hard, which took a lot of patience (Days, with multiple pours as it slightly shrinks when it hardens). When it was ready, I pulled it and it was exactly what I wanted! Of course, the first pull was the best, and over time my plaster mold would break down, but I only needed it for essentially 6-8 pulls. This image shows a good progress; from the mold to the painted product. I ended up having to cut off a lot of excess with an exact-o knife, as well as air bubbles. I painted it with metallic acrylic paint, weathered it, and then it was sewed onto the dress (or attached around my arms).
EYEBROWS/WIG:
For the eyebrows, I wanted them to look as naturally night elfish as possible, without looking too glued together. I ended up opting for pheasant feathers which turned out to be pre-dyed the perfect shade of teal. I gently cut the majority of the feather base off, and then on the ends below the wick I cut off the small fibery parts but was careful to keep them clumped together and available for re-use. The hardest part was gluing these cut pieces and a small jewelry wire along the wick, to give them shape and a fuller look. This took a lot of patience, gluey fingers, and frustration, but it ended up coming together in the end. 
For the wig, I had to do seriously no styling beyond sewing in little pearl beads to simulate the dew drops in the reference image. For the leaves I picked real ones, scanned them, printed, decoupaged, cut, and folded them, then sewed them into the wig. Easy!
GEMS:
The gems were sculpted out of extra clay, then I made a silicone mold and casted them out of clear resin (I picked it up from Micheals arts and crafts), and when they were dry I painted the bottoms with varying shades of blue nail polish, and sealed it with the reflective side of tinfoil. Voila!
A full album of photos can be seen on my cosplay page here!
I hope that was helpful! Feel free to message me on my cosplay page if you have any questions, I’d be happy to help. Thanks!

